We accept:

How to add or remove case fans
This form is protected by reCAPTCHA - the Google Privacy Policy and Terms of Service apply.
Don't have an account?
Creating an account has many benefits: check out faster, keep more than one address, track orders and more.
With the powerful components that are used in most modern gaming PCs, from powerful processors to next generation graphics cards, it is becoming more and more important to properly manage heat dissipation and effectively cool your system, to avoid thermal throttling or even long-term damage to your components.
If you find that your system is getting hot, or even overheating and shutting down, when it’s running, then you may want to consider adding additional case fans.
Nowadays, most gaming PC cases come with a number of fans already pre-installed and will have a set amount of fans that can be added, but the actual process of adding and removing fans is not too difficult.
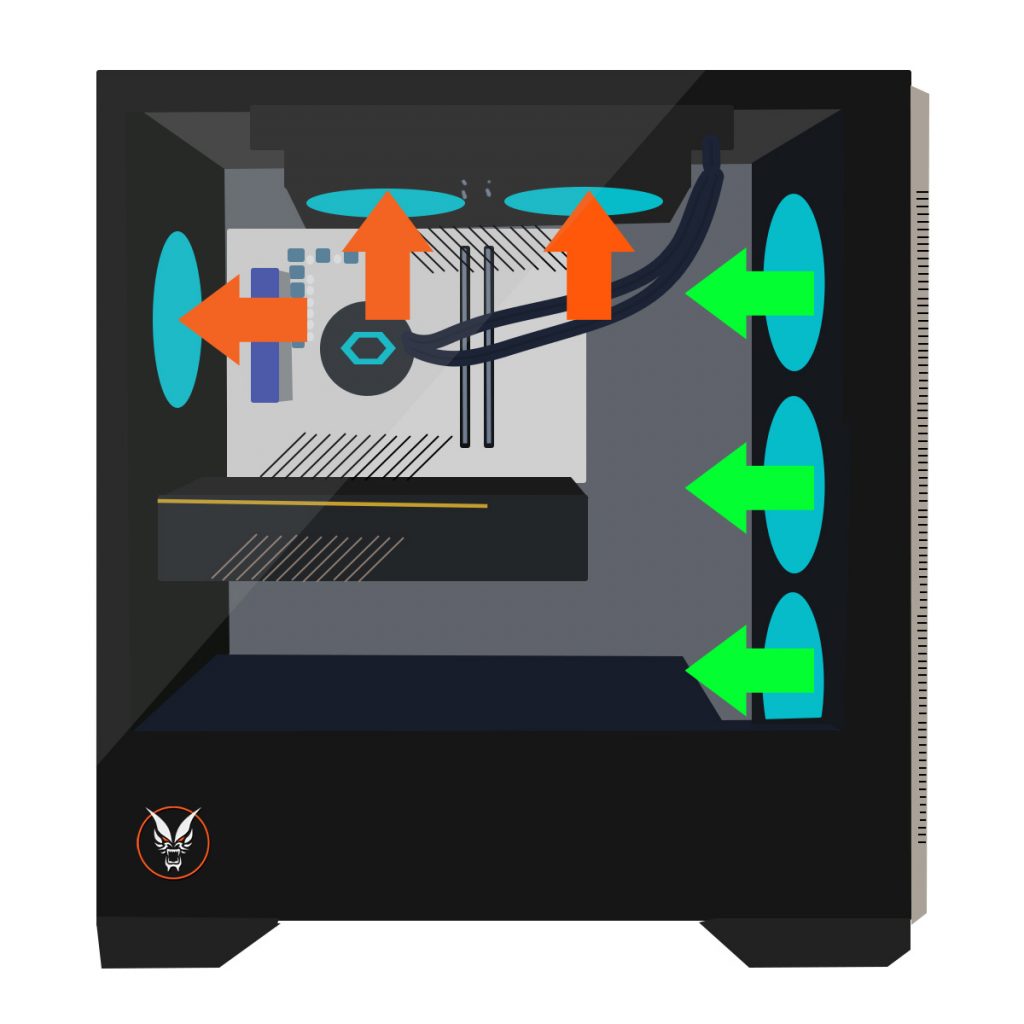
It’s important to consider your systems airflow when you start to consider adding or removing case fans. You should be aware that the purpose of the case fans is not just simply to blow cold air at your components. Rather, your PC case is designed to allow air to flow from the front of the case, to the back, as well as from top to bottom.
The air outside of the PC, which should be cooler than the air inside, is drawn into the system by the ‘intake’ fans at the front of the PC. The cool air flows through your system, cooling all your components, before being pushed out of the back of the case by the ‘exhaust’ fans. This is why having a room where the ambient temperature is cooler than the internal temp of your system, and ensuring your system has sufficient room to ventilate at the back, is really important for effective cooling.
How do I add an extra case fan
Unplug your computer from the wall and ensure that it is off
Remove the left glass panel by unscrewing the two screws at the rear of the case.
Remove the right panel
Remove the front panel
Pass the fan cables through the corresponding opening, so that your fan cables are on the correct side of your case
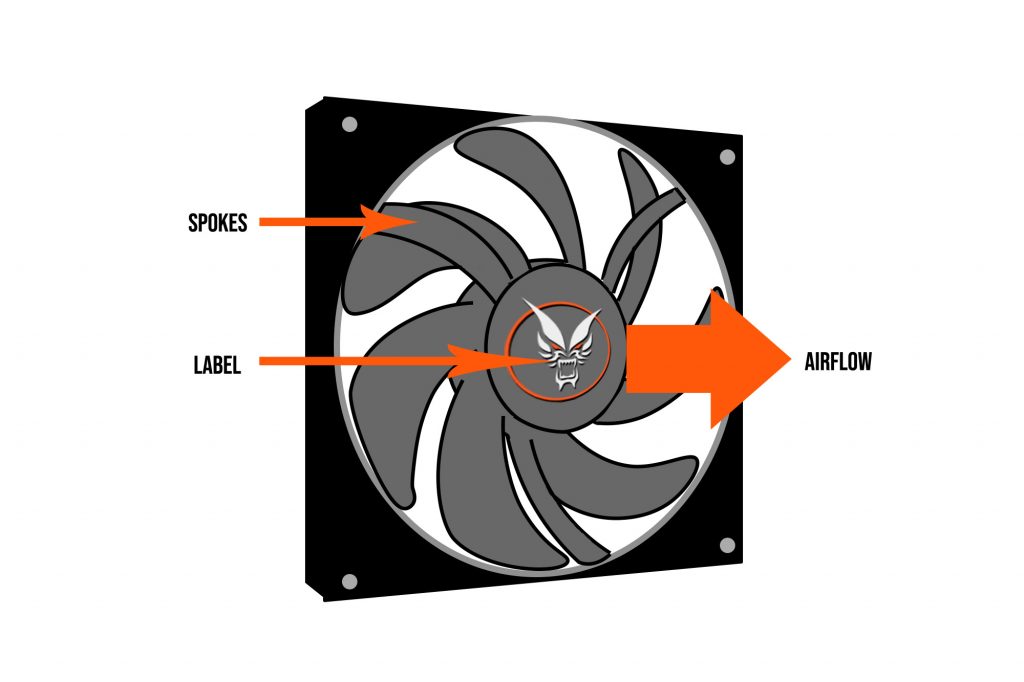
Make sure your fan is aligned to your case frame and then begin to screw the fan to the case, using the correct screws and holes (Make sure your fan is facing the right direction depending on which way you want the air to flow. Some fans will have an arrow on the frame to show the direction of airflow, but if yours doesn’t, air will flow out of the side where the spokes and brand sticker are. There is an exception when you are using reverse airflow fans, which, when the fan blades are facing towards you will be facing the direction the air will be pulled. Standard PC case fans can only push air in one direction).
Once your fans are screwed to your case, you will need to connect the power and any LED lighting connectors. Older fans will most likely use a standard 4-Pin Molex connector, with current modern fans utilizing a 4-pin PWM connector. 4-Pin Molex allows you to ‘daisy chain’, where you literally create a chain of connectors plugged into one another. You can then plug your fan connectors into your PSUs 4-Pin Molex connector. Whereas a 4-Pin PWM connector allows you to connect this to either a motherboard fan header or a control box. If your fans have ARGB or RGB lighting connections, you can daisy chain these too and connect them to either your motherboard (if it has the appropriate 4-Pin RGB or 3-Pin ARGB connectors) or a control box. Some fans may have proprietary connectors, so you may not be able to connect these to your motherboard or molex connection, but will include a form of control box to use, which can then be connected to your PSU’s SATA Power and/or your motherboards internal USB 2.0 header.
Connecting the case fan to your motherboard
Plugging a case fan directly into the power supply can be useful if you don’t have enough fan headers for the amount of fans you are connecting, but it does mean you won’t be able to control the speed of your fans, so it is not the most efficient way to set up.
Instead, you should connect your case fans to your motherboard if you are able to. As long as your fan has a 4 pin cable, plugging it into the motherboard will allow you to control the fan speed from the motherboard BIOS.
The fan headers where you connect your fans will usually be labelled directly on the motherboard as either SYS_FAN (system fan) or CHA_FAN (chassis fan). Don’t use the headers labelled PWR_FAN, CPU_FAN or PUMP_FAN, as these are used for specific components (the power supply fans, CPU cooler fan and AIO liquid CPU Cooler controller respectively).
How do you remove preinstalled case fans
Unplug your computer from the wall and ensure that it is off
Remove the left glass panel by unscrewing the two screws at the rear of the case.
Remove the right panel
Remove the front panel
Trace the wires for the fans to disconnect the power connections and RGB light connections
Unscrew the screws on each fan to detach them from the case frame
How do you connect two case fans
Connecting multiple case fans, known as ‘daisy chaining’ is only an option with certain fans, so if it is something you might want to do, you should refer to the manufacturer documentation prior to purchasing your new fans.
Fans with daisy chain support have an end which plugs into your motherboard, as usual, but the opposite side of the end has a socket that another fan can plug into. This effectively allows you to use one fan header on your motherboard to power multiple fans. How many fans you can daisy chain will depend on the power requirements, but generally, you can run up to four fans in one chain.
How to identify a faulty fan
Before you get into replacing your fans, how do you actually know if a fan needs replacing? There are a few indications that a fan is failing or fault:
Loud or unusual noise: If you notice that your PC is suddenly a lot louder than it used to be, or it’s making unusual grinding noises, this could be a sign that one or more of your fans is on its way out. You should check the fan for excessive dust buildup or clogs and remove this with a cloth or compressed air, and then check the fan again before you replace it.
Incorrect RPM reading: If you suspect that a fan might be faulty, you can take a look at the fan speed in your system BIOS or in your fan control software (if you have any). If the speed of the fan seems erratic, or low, or if the reported speed is very obviously different to the speed the fan is moving, this could indicate an issue and the fan may need replacing.
Vibration and excessive movement: A fan where the blades have been damaged or there is some sort of imbalance can cause excessive vibration or movement inside your system.
System overheats: Frequent overheating, or your system shutting down repeatedly can all indicate a failing case fan. If your fans aren’t operating correctly, then heat won’t be properly dissipated from your system and this can cause issues with your PC overheating.
Dust build up: Dust build-up happens within your system and it is usually easy to deal with, using a cloth, compressed air or an appropriate vacuum attachment. One of the first things you should do if you suspect a fan is failing is to visually inspect the fan and make sure there is no dust accumulated on the blades, and there is no damage to the fan that could be preventing the fan from operating correctly.
Choosing the right fan
When it comes to choosing what fans you purchase for your PC, the most important of these is to ensure that you choose the right size of fan. Fan sizes are measured in millimetres and your case will only support a certain size of fan. Take a look at the manufacturer documentation for your case and look for the information on ‘fan bays’. This will usually outline where you can have fans in your system (Front, Rear, Top, Bottom) and how many fans of what size you can have in those locations. You might see something like Front: 3 x 120mm (included)/ 2 x 140mm - this means that the case can have three, 120mm fans at the front and that these are built into the case as standard, but you could also have two 140mm fans in place of those 120mm fans if you preferred. As a general rule, the bigger the fan, the more air it can push through your system, the slower its blades turn and therefore, the quieter it is.
Maintaining positive pressure
When you hear someone talk about positive, negative or neutral air pressure, they are making a reference to the amount of intake vs outtake fans that are in the system. To clarify, positive pressure means you have more intake fans than exhaust fans. Negative pressure means you have more exhaust than intake, and neutral means you have a balance of intake and exhaust fans. There are pros and cons to each setup, though the general consensus is that you should go with a neutral pressure or slightly positive. There doesn’t seem to be much difference in the cooling efficiency between these two pressures, but the positive pressure can help with keeping the system less dusty.
Is negative air pressure bad for your PC?
Negative air pressure isn’t bad per se, and in fact, it can be very effective for cooling your system. Negative air pressure has a bad reputation amongst PC builders because it draws more dust into your PC than the other pressure systems. It is this dust that is bad for your system because it can clog up your fans and components, causing your system to overheat.
Which direction to install case fans?
Remember, most PC case fans will only push air in one direction. You can sometimes see the direction of airflow printed as an arrow on the casing of the fan, but if you’re unsure, air comes out of the side with the spokes and label. As a general rule of thumb, you want the fans at the front of your system to be intake and the fans at the back of your PC to be exhaust, and you want any fans at the bottom of the case to be intake and any fans at the top to be exhaust.
Is it okay to use different case fans?
Yes, it is usually okay to have case fans from different brands in the same build, but you should keep a few things in mind.
Are your fans compatible? - You need to make sure that all your fans, regardless of brand, are compatible in terms of size and connector type.
Performance - Depending on the fan, you will have variances in airflow and static pressure ratings. If you want to have well-balanced cooling throughout your system (which you do!), then you should be looking for fans with similar performance characteristics.
Looks - If how your build looks is important to you, you may want to consider using the same brand and type of fan consistently through your build. Whilst it isn’t a requirement, it will keep your PC looking the best, especially if you end up with some fans with RGB lighting and some fans without!
How many case fans can I have?
This really depends upon your system, and is going to be dictated by the size of your case, the number of mounts available for case fans, and also your motherboards and the number of fan headers available. As a minimum, you are going to need at least one intake fan and one exhaust fan.
Looking to add new case fans or cooling to your system? Check out our extensive component store!